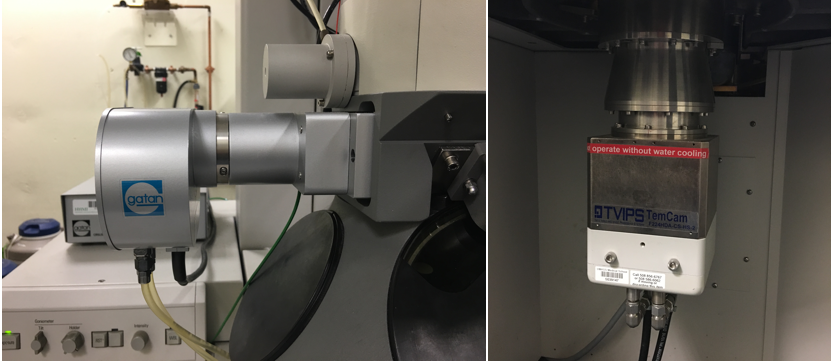
We no longer use film for TEM exposure anymore! Instead, we use digital camera. There are basically two types of digital cameras available on the market for TEM applications - Charge-Coupled Device (CCD) and Direct Electron Detector. On CM120, there are two cameras installed - Gatan Orius model 832 and Tietz TemCam 224-HD. They both are CCD type of cameras. In this document, I give information about basic properties of the cameras, how to use them with CM120 and specific technical note for why we need use them in such way.
It also lists pixelsize inforamtion for both cameras so you can decide which magnification you want to use for your final image. I also try to show you how to use SerialEM to control them.
A pdf version of this document is also available.
Here are two images of the cameras on CM120.
This table lists some important propertt parameters:
| Property | Gatan Orius 832 | Tietz TemCam 224-HD |
|---|---|---|
| Format | 3768 x 2672 | 2048 x 2048 |
| Pixel Size on Chip(μm) | 9.0 | 24.0 |
| Digitization | 14-bit | 16-bit |
| Light Coupling Mechanism | Fiber Optic | Fiber Optic |
| Mounting Position | sided-mount via 35mm port | bottom-mount |
You can find more information about these two cameras from vendor's datasheets for F224-HD and Gatan Orius.
Shutter control usually means TEM shutter control by hardware or software of digital camera. The purpose, in most cases, is to have no beam on camera except exposure period. Not all camera reaquires having TEM shutter control to get an image. For cryoEM applications where accurate dose is to be concerned, it makes a lot of sense to have shutter control. Fortunitely, most of high-end digital cameras for TEM have TEM shutter control support.
The shutter discussed here is not any kind of mechanical shutter. Instead, it is electronic. If an alignment coil in TEM column is put to a "bad" value, then the beam disppears due to misalignment. We call it shutter closed. And we call it open when the good alignment coil current is restored. Therefore, this kind of electronic shutter can open and close very quickly.
An exposure on film requires no beam before film is pushed in to final location and stablized; and it opens shutter to let beam shine on film to expose and then shutter is closed again when exposure finishes. On FEI microscope with Low Dose funtionality, one can even define pre-expose time. In this case, two shuttes are required to work together - first shutter above specimen opens to have beam pre-expose on sample for certain period of time, then second shutter below specimen opens to start exposure on film. Usually, the two alignment coils to be controlled as upper and lower shutters are Gun Upper coil and a Film Shutter Coil next to projector lens. All this is done within FEI software control for when and which shutter is open or close. We usually call this internal shutter control.
To image with a digital camera, especially for a beam sensitive specimen, shutter control is therefore also needed. If configured correctly, when camera is inserted and large screen of TEM is lifted, the beam should be blanked. This shutter control is achieved by changing the same alignment coils using shutter cable(s) from camera controller. The shutter cable directly connects to TEM hardware so that when large screen is lifted, an extra voltage is sent to TEM coil to "screw up" a good alignment. Thus, beam is blanked. If we need to pre-expose our sample for whatever reason, then two cables will be needed - one for pre-specimen and one for post-specimen. This control is done by using external hardware. We normally call this "external" shutter control as it is not via TEM software.
For convenience, we usually call the shutter of Gun Upper Coil "the beam blanker"; and Film Shutter Coil "the film shutter".
The Orius controller for 35mm port sided-mount camera has no shutter cable from the controller. Therefore, it doesn't control the beam at all. It is possible to add the shutter control cable to the system, but for acquisition of an image, the TEM shutter control is optional for this camera. Of course, as you might imagine, this is not ideal for cryoEM application.
The picuture below is the front and back to Orius camera controller, and Tietz camera controller as well(small one on the top). You can see there is no cable hooked on Orius controller for shutter control.

For TemCam 224HD camera, there are shutter control cables from the controller box, shown in the image above. This is little box on the top of Orius controller. As explained in previous section, the two shutter control cables (in red)are directly connected to TEM hardware. And there is a flat ribbon-like cable, is also connected to TEM hardware. That is to control signal with large screen of TEM being Up or Down. To be more specific, when large screen is lifted Up, the signal from this "Screen" cable to controller box triggers a 5V signal being sent to scope via the two shutter control cables, so beam is blanked with large screen position as a switch.
The two cables with red connectors are labeled "BB" and "SH", for Beam Blanker and Shutter respectively. BB cable is connected to Gun Upper Coil as explained in previous section. It can be confirmed from scope "CURRENT READOUT " page. Below is two screen snapshots for large screen being at Down and Up. You can see the Gun Upper Coil current values in these two situations. One can easily see the Gun U-X is changed from -77 to -195 when screen is lifted.
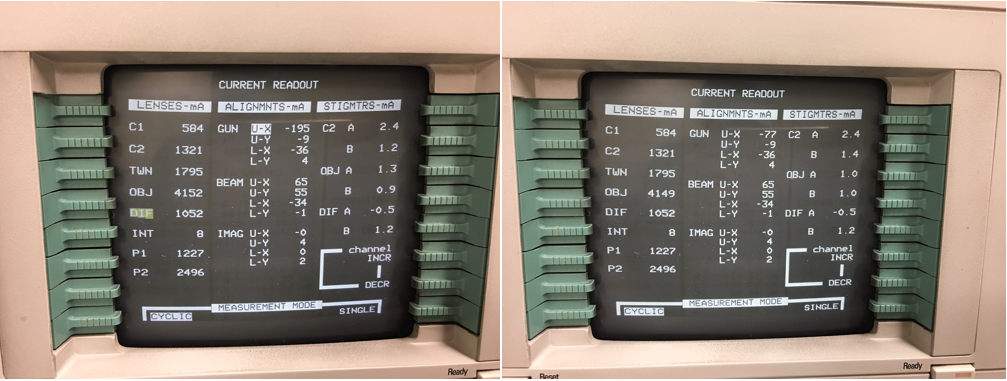
When you lift the screen, you can see beam disappearing suddenly.
Note:
The dip switch on Tietz camera control box has to flip to right "CCD". If it is on "TEM", the shutter control by Tietz CCD is completely off.
These both CCD cameras are water cooled. More strictly speaking, the disspated heat from electronic cooling has to be taken away by water. Therfore, we must to have cooling water running normally to run the CCD cameras. The set working temperature for Orius is 10°C, and it is -25°C for Tietz TemCam 224HD. The advantage to have lower temerature for CCD imaging is low thermal noise. In genera, it is advisable to let CCD be cooled long enough before using the camera.
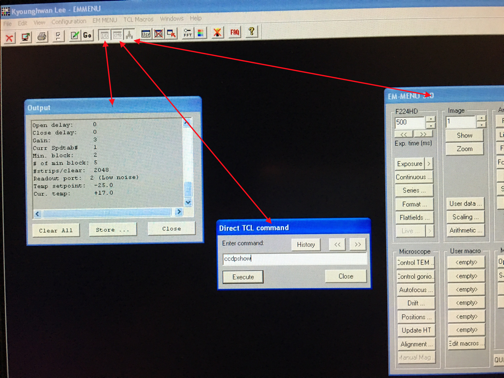
The temperature can be checked for each camera using their softwares. For Orius, from DigitalMicorgraph, one can check menu Camera - Temperature. On Tietz camera, one has to start up TCL interface and also EMMENU from TCL. After that, one has to open result log window and command window. From command window, type "ccdpshow" and then hit . The temperature will show in result window.
Each camera has its own controlling software. It is DigitaMicrograph (DM) for Orius and EM-MENU for Tietz. In order to have pixel size information, both software tries to communicate with CM120 via a single COM port. If you run start both softwares, one of them will complain for not being able to connect to COM port. You can still take images using either one, just you might not get scale bar for one camera.
For image data that will be processed later, the scale bar is not that important, but the pixelsize is. And we don't have to always use its own native software to control CCD camera to get an image. One of the good alternative is SerialEM.
SerialEM is a program for TEM data collection for both single particle and tomography applications. It communicates to TEM and digital camera. Currently, it doesn't support CM120 without any hacking due to TEM software, but it controls both cameras we have just fine. One of the advantages with SerialEM is to be able to directy save data as stack file and MRC as file format.
SerialEM controls Gatan camera by a plugin dll file put in Gatan's plugin folder. In this case, DM has to started. When controlling Tietz camera, it directly talks to the Tietz's registered dll modules. In this case, no Tietz software needs to be started. Therefore, one starts DM first and then start SerialEM and you are ready to go!
Since SerialEM doesn't talk to CM120 computer, we have to use fake mag and screen position to match the real situation on scope. This way, the image file saved on SerialEM will have valid and correctly pixelsize information in MRC header.
To use it, you click on the three macro buttons , and to match current microscope state. That's it.
The tabe below list pixelsize at specimen level for different scope magnificatios. Please note that with large screen position as Up and Down, the CM120 TEM interface display different mag values. This is meant for mag at different "collecting" level - ScreenDown mag means at screen level and ScreenUp means at film level. We run Orius with screen Down and Tietz with Screen Up.
| Mag_Screen UP / DOWN (X) | Pixelsize_Orius(nm) bin=1 | Pixelsize_Tietz(nm) bin=1 |
|---|---|---|
| 35 / 31 | 1134 | 464 |
| 45 / 40 | 882 | 361 |
| 60 / 54 | 661 | 270 |
| 80 / 71 | 496 | 203 |
| 110 / 97 | 361 | 148 |
| 150 / 135 | 265 | 108 |
| 190 / 170 | 209 | 85.4 |
| 260 / 230 | 153 | 62.4 |
| 340 / 300 | 117 | 47.7 |
| 450 / 400 | 87.3 | 36.1 |
| 600 / 530 | 66.1 | 27.0 |
| 800 / 710 | 49.6 | 20.3 |
| 1000 / 880 | 39.7 | 16.2 |
| 1400 / 1259 | 28.4 | 11.6 |
| 1800 / 1040 | 22.3 | 9.11 |
| 2300 / 2050 | 17.7 | 7.22 |
| 3000 / 2650 | 13.1 | 5.22 |
| 3800 / 3400 | 10.3 | 4.18 |
| 5000 / 4400 | 8.03 | 3.27 |
| 6300 / 5600 | 6.09 | 2.47 |
| 8000 / 7100 | 4.84 | 1.96 |
| 10000 / 8800 | 3.94 | 1.59 |
| 13000 / 11500 | 3.01 | 1.23 |
| 17000 / 15000 | 2.34 | 0.948 |
| 22000 / 19500 | 1.94 | 0.836 |
| 28000 / 25000 | 1.50 | 0.648 |
| 35000 / 31000 | 1.18 | 0.508 |
| 45000 / 40000 | 0.909 | 0.392 |
| 60000 / 53000 | 0.647 | 0.279 |
| 75000 / 66000 | 0.523 | 0.225 |
| 100000 / 88000 | 0.404 | 0.164 |
| 125000 / 110000 | 0.323 | 0.131 |
| 160000 / 140000 | 0.253 | 0.102 |
| 200000 / 175000 | 0.202 | 0.082 |
| 260000 / 230000 | 0.155 | 0.063 |
| 340000 / 300000 | 0.119 | 0.048 |
| 430000 / 380000 | 0.094 | 0.038 |
| 580000 / 510000 | 0.070 | 0.028 |
| 750000 / 660000 | 0.054 | 0.022 |